Display
In Mini Micro, Display is the base class for all the display types, and the class of any display that is off (mode 0). In addition, display (all lowercase) is a function that returns one of the eight displays in Mini Micro's display system.
Contents
Architecture of the display system
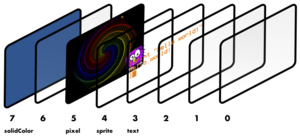
Mini Micro supports eight simultaneous displays, numbered from 0 (frontmost) to 7 (in the back). Each display may be either off, or one of five more specific display types (solid color, text, pixels, tiles, or sprites). Any transparent or translucent areas of one display reveal the displays behind it. Behind all the display layers is solid black.
Display class
| Property | Purpose |
|---|---|
| Display.mode | get or set the display mode |
| Display.install index | install a display into the display layer with the given index |
Subclasses
display function
The global display function returns a reference to the current display for the given layer number (0-7). Note that the display object in each layer changes when the mode is changed, so you will need to get a fresh reference (using this function) after changing the mode.
Arguments
| Parameter Name | Type | Default Value | Meaning |
|---|---|---|---|
| n | number | 0 | display (layer) number to get |
Examples
This first example sets display layer 2 to pixel mode, clears it, and then draws a big translucent purple ellipse.
display(2).mode = displayMode.pixel
g = display(2)
g.clear
g.fillEllipse 0, 0, 960, 640, "#8800FF88"
The following longer example fills display 1 with a solid color, except for a clear circle that follows the mouse. The effect is like a flashlight or scope peering at the content of the screen (including the standard text layer) through a thick fog.
// set up a "fog" (overlay) layer to obscure most of the screen
display(1).mode = displayMode.pixel
fog = display(1)
fog.color = color.gray
fog.clear fog.color

// define the radius of our flashlight spot
r = 80

// always keep track of the last position of the spot
spot = {"x":0, "y":0}

// main loop
while true
	yield

	// fill in the old spot
	// (we'll actually fill a rectangle since that's faster)
	fog.fillRect spot.x - r, spot.y - r, r*2, r*2

	// then clear the new spot (as an actual circle)
	spot.x = mouse.x
	spot.y = mouse.y
	fog.fillEllipse spot.x - r, spot.y - r, r*2, r*2, color.clear
end while
See also: displayMode
