How to get started with Mini Micro
Mini Micro is a popular environment for creating 2D games and demos in MiniScript. It is a retro-style virtual computer, which runs on most desktop platforms. Mini Micro games can be packaged as stand-alone games for desktop or the web.
This page is meant for people who have never used Mini Micro before, but want to make a Mini Micro game. It is a step-by-step guide to building your first simple demo involving a sprite, game input, and sound effects, including your own resources, as quickly as possible.
Contents
Get Mini Micro
While you can run Mini Micro on the web, the web version has no ability to save files (nor does it support copy/paste). So it's not useful for developing your own Mini Micro games.
Go to the Mini Micro download page, click the button for your platform (Mac, Windows, or Linux), and save the resulting file to your local machine. (If you don't have a Mac, Windows, or Linux desktop machine, then unfortunately you can't use Mini Micro yet, though iOS and Android versions are under development.)
The downloaded file will be a .zip (Mac/Windows) or .tar.gz (Linux) file. Unpack this file completely. Don't try to run Mini Micro from within the archive; extract all files to a real folder on your hard drive.
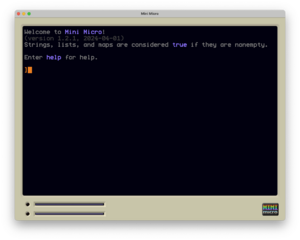
Then, find the Mini Micro application in that folder. Double-click it to launch Mini Micro. The result should look like this.
Mount a folder as /usr
Mini Micro can access two virtual "disks" at once; within the Mini Micro environment, these are accessed as /usr and /usr2. Each of these can be either a .minidisk file, or a real folder on the host (desktop) system. Out of the box, Mini Micro creates an empty .minidisk file for you, to keep things nice and neat. But for any serious development, you're going to want to mount a real folder instead, so that you can easily move files in and out of this folder, use your favorite external image/sound editors, etc.
Create a folder on your desktop system, wherever you normally keep your documents. This will be your project folder for your first Mini Micro game. Put a small text file, image (in PNG or JPEG format), or sound file (in WAV or OGG format) in there. Our goal now is to see and view this file (and any others in that folder or its subfolders) in Mini Micro.
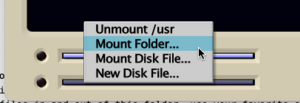
Those two thin dark rectangles in the bottom-left corner of the Mini Micro window are "disk slots." The top slot represents /usr, and the bottom slot represents /usr2. Click the top slot to pop open the menu, and select the "Mount Folder..." command.
Selecting that command should bring up the native file dialog for your platform, allowing you to select any folder you have access to. Pick the project folder you created above. (Note: some Linux platforms have a bug which crashes Mini Micro at this point; if that happens to you, go on to Method 2.)
Now, in the Mini Micro display, at the blinking orange prompt, type:
dir
and press Return or Enter. You should see your file listed. Now try:
view "myfile.txt"
but replace myfile.txt with the name of whatever file you placed in your project folder. Be sure to include the quotation marks; you're typing MiniScript code here, not some other shell language, so string literals always need to be surrounded by double quotes. If you do it correctly, the contents of your text file or image should appear on the screen.
(You could also do view findFile, which would pop up the little file browser within the findFile command, and select your file that way.)
Note that the currently mounted disk is saved in preferences, so if you quit and relaunch Mini Micro, you generally won't need to do this step again; the previously mounted disks will still be there.
Method 2: Use command-line arguments
If you are unfortunate enough to hit that Linux bug which causes the file dialogs to crash, or for some other reason you want to launch Mini Micro from the command line (or a shell script) with the correct folder already mounted, then you can use command-line arguments instead. Open your favorite terminal program, and navigate to where the Mini Micro executable is located. The details vary by platform, so let's break it down:
Linux
In Linux, the executable is called MiniMicro.x86_64, so you would type a command like this:
./MiniMicro.x86_64 -usr ~/mmdev
Replace ~/mmdev with the path to your project folder.
Windows
In Windows, you can open the command prompt by pressing Win + R to open the Run dialog, and entering cmd. (If you already have some other preferred terminal app, like PowerShell, that's fine too.) Then cd to the directory containing Mini Micro. The executable here is called Mini Micro.exe, so you would use a command like:
"Mini Micro.exe" -usr "%HOMEPATH%\mmdev
Replace %HOMEPATH%\mmdev with the path to your project folder.
MacOS
On Mac, the actual executable is hidden inside the application bundle, specifically under Contents/MacOS. So if you've already launched Terminal and navigated to where MiniMicro.app is found, then you would do
Contents/MacOS/Mini\ Micro -usr ~/Documents/mmdev
Replace ~/Documents/mmdev with the path to your project folder.
If successful (on any platform), you should be able to use the dir and view commands to view the file in your project folder within the Mini Micro environment.
Create a sprite
Now let's get a sprite up on the screen. We're going to do this using the Mini Micro command line (or REPL), where you type a command and executes immediately. We'll get to writing real programs later, but the command-line is a powerful tool for learning and exploring, so let's use it.
1. Make a sprite from the built-in images
At the orange blinking-cursor prompt in Mini Micro, carefully type the following:
clear
sp = new Sprite
sp.image = file.loadImage("/sys/pics/Wumpus.png")
display(4).sprites.push sp
You should see a furry purple Wumpus peeking out from the lower-left corner of the screen (which is the origin of Mini Micro's coordinate system).
If you don't see this, go back and double-check your typing. Note that you can recall a previous command on the command line by pressing the 'up-arrow key, then just edit it and press Return to run the edited command.
How does this work? Let's break it down:
clearclears the screen and resets all eight display layers to their default states. This includes setting display 4 to be a SpriteDisplay. (That's the default state when Mini Micro boots, but useful whenever your screen is cluttered anyway.)sp = new Spritecreates a new Sprite object, and assigns it to a variable calledsp.sp.image = file.loadImage("/sys/pics/Wumpus.png")loads an image called "Wumpus.png" from the/sys/picsdirectory. (Notice that Mini Micro uses forward-slashes in file paths, even if the host system is Windows.)display(4).sprites.push sppushes this new sprite onto the sprite list of display 4, so it can be seen.
Once you have the Wumpus peeking out of the corner, let's move it and rotate it a bit. Notice how the sprite updates immediately after each command.
sp.x = 480
sp.y = 320
sp.rotation = 45
2. Make a sprite from your own custom image
The Wumpus sprite above was created from one of the built-in images that comes with Mini Micro. There are hundreds of these, stored on a hidden, read-only disk mounted as /sys. Feel free to use the findFile command to explore what's there.
But for your own game, you're probably going to want to use your own custom sprites. So, put an image in PNG format into your project directory (the one you mounted as /usr). Use the pwd (print working directory) and cd (change directory) commands to be sure you are in your /usr directory. Then use the dir and view commands to ensure that you can see and load your user file.
Now, just repeat the commands you did to create a sprite above, but substitute the path to your custom image.
sp = new Sprite
sp.image = file.loadImage("myCustomImage.png")
display(4).sprites.push sp
If you haven't cleared the display since step 1, then you'll see your new sprite and the Wumpus on screen at the same time. And if you now move (by assigning to .x and .y) your sprites so that they overlap, you'll see that your new sprite is drawn on top of the older one. That's because sprites are drawn in the order in which they appear in the sprites list of the SpriteDisplay.
3. Extract an image from a sprite sheet
Often you have multiple sprite images arranged in one bigger image file, called a sprite sheet or sprite atlas. You can pull apart such a sprite sheet by using the Image.getImage function. Let's try:
enemies = file.loadImage("/sys/pics/Enemies.png")
view enemies
This loads and displays this big image, which contains a number of platformer enemies, in a 128x128 pixel grid. Let's make a sprite out of the top-left image. Keep in mind that coordinates in Mini Micro go from the bottom-left corner, so that top image starts at 128 * 3 = 384.
goob = new Sprite
goob.image = enemies.getImage(0, 384, 128, 128)
display(4).sprites.push goob
This creates a new sprite called goob, assigns it an image from our enemies sprite sheet, and pushes it onto the display. As always, it starts out in the bottom-left corner, but you know how to adjust that by now. Since this sprite is a bit bigger than it probably needs to be, also try goob.scale = 0.5 to shrink it down.
Play a sound
1. Play one of the built-in sounds
2. Play your own custom sound
3. About synthesized sounds
Write a program
=== Method 1: Use the built-in code editor
=== Method 2: Use an external code editor
=== A simple game demo

