Difference between revisions of "Mini Micro code editor"
| (3 intermediate revisions by the same user not shown) | |||
| Line 5: | Line 5: | ||
[[File:CodeEditor.png|800px|frameless|center|Screen shot of the Mini Micro code editor.]] | [[File:CodeEditor.png|800px|frameless|center|Screen shot of the Mini Micro code editor.]] | ||
| + | |||
| + | The code editor is meant to be used with a keyboard and mouse, like any desktop text editor. Select text by clicking and dragging with the mouse, by shift-clicking, or by holding Shift while using the arrow keys. Type to replace the selected text. If your keyboard has Page Up/Down and Home/End keys, these may be used to navigate in addition to the scrollbar. | ||
| + | |||
| + | If any line of code in the current program is wider than the screen, a horizontal scrollbar will appear at the bottom of the screen. | ||
| + | |||
| + | The code editor can only edit one program at a time, specifically, the program currently in memory (see <c>[[load]]</c> and <c>[[reset]]</c>). Changes made in the code editor always affect the current program in memory, but will not change the program on disk unless '''Auto-Save''' is checked or you save manually. | ||
| + | |||
| + | == Toolbar == | ||
At the top of the screen is the <b>toolbar</b>, containing various buttons and menus as follows: | At the top of the screen is the <b>toolbar</b>, containing various buttons and menus as follows: | ||
| Line 12: | Line 20: | ||
* '''Close''' (keyboard shortcut: Control-W): closes the code editor, returning you to the MiniScript prompt. If '''Auto-Save''' is checked, and there is a '''File path''' shown, the contents of the editor will also be saved to that file. | * '''Close''' (keyboard shortcut: Control-W): closes the code editor, returning you to the MiniScript prompt. If '''Auto-Save''' is checked, and there is a '''File path''' shown, the contents of the editor will also be saved to that file. | ||
| − | * '''Save''' (control-S): saves the contents of the editor to the path shown in '''File path'''. If there currently is no path set, or if you hold the | + | * '''Save''' (control-S): saves the contents of the editor to the path shown in '''File path'''. If there currently is no path set, or if you hold the Shift key while clicking this button or pressing control-S, then you will be prompted for a path (relative to the current directory) in which to save. |
* '''Revert''': replaces the contents of the editor with a fresh reload of the file shown in '''File path'''. | * '''Revert''': replaces the contents of the editor with a fresh reload of the file shown in '''File path'''. | ||
| Line 34: | Line 42: | ||
* '''Help''': opens the web browser on your host machine to the Mini Micro section of this wiki. | * '''Help''': opens the web browser on your host machine to the Mini Micro section of this wiki. | ||
| − | == | + | == Find & Replace == |
| − | + | Clicking the magnifying class in the toolbar, or pressing control-F, summons or dismisses the ''Find and Replace dialog'': | |
| + | |||
| + | [[File:findReplaceDialog.png|968px|frameless|center|find/replace dialog in Mini Micro code editor]] | ||
| + | |||
| + | This is a simple but powerful tool for both finding and replacing selected occurrences of some text in your program. Usage is as follows: | ||
| + | |||
| + | # Type the text you want to search for in the "Find" field. As soon as you press Return (or click any of the buttons in step 2), the search results appear below. | ||
| + | # Use any combination of the three buttons to the right of the "Find" field to restrict your search: | ||
| + | ## Match case | ||
| + | ## Match whole words | ||
| + | ## Match only within the selected text | ||
| + | # Double-click any search result to jump to that line and select the matching text. OR, | ||
| + | # Type new text to replace the matched result in the "Replace with" field. | ||
| + | # To replace only ''some'' matches, but not all, click the checkbox to the right of any search result. (Holding Alt or Option while clicking a checkbox will turn all the checkboxes on/off at once.) | ||
| + | # Click the "Replace" button to replace only the checkmarked matches with the new text. | ||
| + | |||
| + | When done, press control-F or click the magnifying glass again to dismiss the Find and Replace dialog. | ||
== Customization == | == Customization == | ||
| Line 66: | Line 90: | ||
The above example shows all the supported color keys. Note that <c>text.paren</c> and <c>text.bracket</c> are lists of colors, rotated through to indicate deeper levels of nested parentheses or square brackets. These lists may be as long or short as you like. | The above example shows all the supported color keys. Note that <c>text.paren</c> and <c>text.bracket</c> are lists of colors, rotated through to indicate deeper levels of nested parentheses or square brackets. These lists may be as long or short as you like. | ||
| − | |||
| − | |||
[[Category:Mini Micro]] | [[Category:Mini Micro]] | ||
Latest revision as of 04:36, 4 July 2023
Mini Micro comes with a built-in code editor, accessed with the edit command.
General Usage
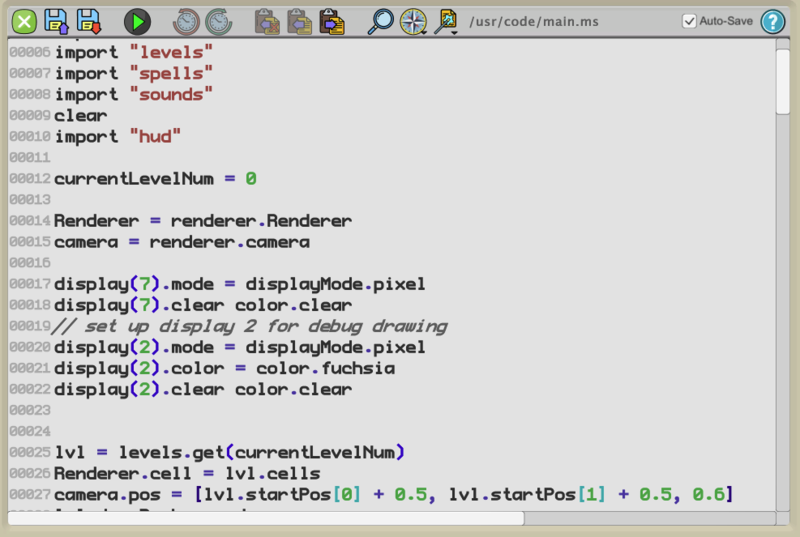
The code editor is invoked with the edit command. This replaces the standard Mini Micro display with a graphical (GUI) code editor, as shown below.
The code editor is meant to be used with a keyboard and mouse, like any desktop text editor. Select text by clicking and dragging with the mouse, by shift-clicking, or by holding Shift while using the arrow keys. Type to replace the selected text. If your keyboard has Page Up/Down and Home/End keys, these may be used to navigate in addition to the scrollbar.
If any line of code in the current program is wider than the screen, a horizontal scrollbar will appear at the bottom of the screen.
The code editor can only edit one program at a time, specifically, the program currently in memory (see load and reset). Changes made in the code editor always affect the current program in memory, but will not change the program on disk unless Auto-Save is checked or you save manually.
Toolbar
At the top of the screen is the toolbar, containing various buttons and menus as follows:
- Close (keyboard shortcut: Control-W): closes the code editor, returning you to the MiniScript prompt. If Auto-Save is checked, and there is a File path shown, the contents of the editor will also be saved to that file.
- Save (control-S): saves the contents of the editor to the path shown in File path. If there currently is no path set, or if you hold the Shift key while clicking this button or pressing control-S, then you will be prompted for a path (relative to the current directory) in which to save.
- Revert: replaces the contents of the editor with a fresh reload of the file shown in File path.
- Run (control-R or F5): closes the editor and executes the
runcommand to run the edited source code. If Auto-Save is checked, and there is a File path shown, the contents of the editor will also be saved to that file.
- Undo (control-Z) and Redo (shift-control-Z): undoes and redoes the last editing action.
- Cut (control-X), Copy (control-C), Paste (control-V): standard text cut/copy/paste operations common to all text editors.
- Find/Replace (control-F): opens/closes the Find/Replace dialog on the bottom portion of the screen.
- Navigate: a menu containing a "Jump to line..." command, as well as any functions found in your source file; selecting any function name jumps to the start of that function in the code.
- Code: a menu containing Comment/Uncomment Line, Insert Color, and a variety of code snippets (for loops, etc.). Code snippets are loaded from /sys/data/codeSnippets.txt, and /usr/data/codeSnippets.txt (if that exists).
- File path: shows the path of the file currently being edited, if any. This area is blank if you are editing a program in memory that is not yet associated with any disk file.
- Auto-save checkbox: if checked, then the contents of the editor are automatically saved whenever the editor is closed. If not, then any code changes are in memory only; you may
runand test them, but they will not be written to disk unless you manually do asave.
- Help: opens the web browser on your host machine to the Mini Micro section of this wiki.
Find & Replace
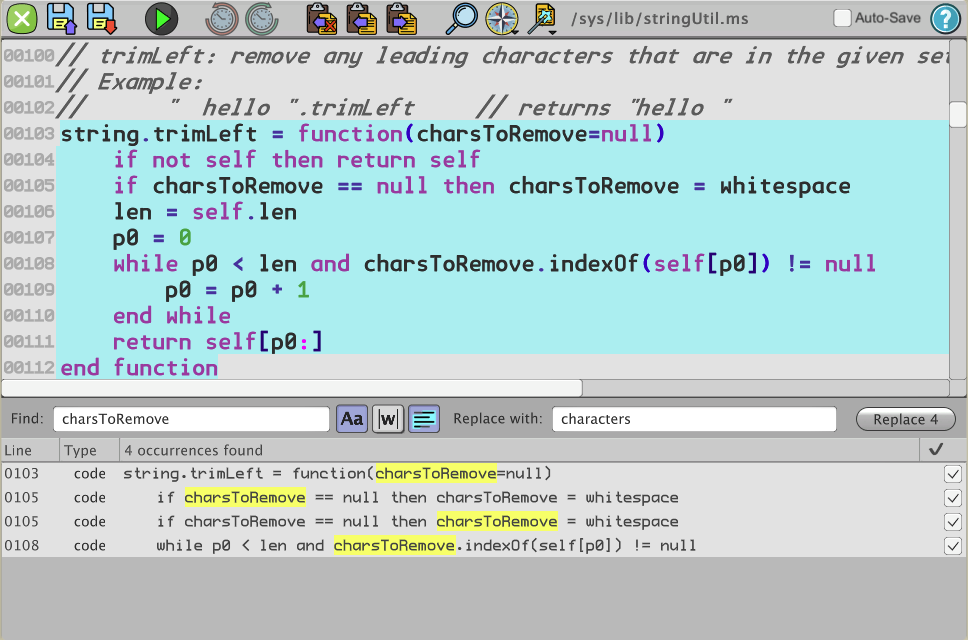
Clicking the magnifying class in the toolbar, or pressing control-F, summons or dismisses the Find and Replace dialog:
This is a simple but powerful tool for both finding and replacing selected occurrences of some text in your program. Usage is as follows:
- Type the text you want to search for in the "Find" field. As soon as you press Return (or click any of the buttons in step 2), the search results appear below.
- Use any combination of the three buttons to the right of the "Find" field to restrict your search:
- Match case
- Match whole words
- Match only within the selected text
- Double-click any search result to jump to that line and select the matching text. OR,
- Type new text to replace the matched result in the "Replace with" field.
- To replace only some matches, but not all, click the checkbox to the right of any search result. (Holding Alt or Option while clicking a checkbox will turn all the checkboxes on/off at once.)
- Click the "Replace" button to replace only the checkmarked matches with the new text.
When done, press control-F or click the magnifying glass again to dismiss the Find and Replace dialog.
Customization
As of Mini Micro version 1.2, you can customize the colors used by the code editor by creating a map of color names to colors, and assigning this to env.editorColors. The following example shows how to use this to create a "dark mode" color theme.
// Set up a dark theme for the editor.
m = {}
m.codeBackground = "#333333"
m.noCodeBackground = "#000000"
m.lineNumber = "#666666"
m.caret = "#CCCCCCCC"
m.toolbarTint = "#CCCCFF"  // (keep light for best results)

m.text = {}
m.text.default = "#BBBBBB"
m.text.operator = "#AAAADD"
m.text.string = "#DDAAAA"
m.text.openString = "#FF0000"
m.text.identifier = "#BBBBBB"
m.text.comment = "#FFFFCC"
m.text.number = "#88FF88"
m.text.keyword = "#FF99FF"
m.text.colon = color.fuchsia
m.text.paren = ["#00FFFF", "#FF8800", "#CC44FF", "#00FF00"]
m.text.bracket = m.text.paren

env.editorColors = m
The above example shows all the supported color keys. Note that text.paren and text.bracket are lists of colors, rotated through to indicate deeper levels of nested parentheses or square brackets. These lists may be as long or short as you like.


